猫猫分享,必须精品
原创文章,欢迎转载。转载请注明:翟乃玉的博客
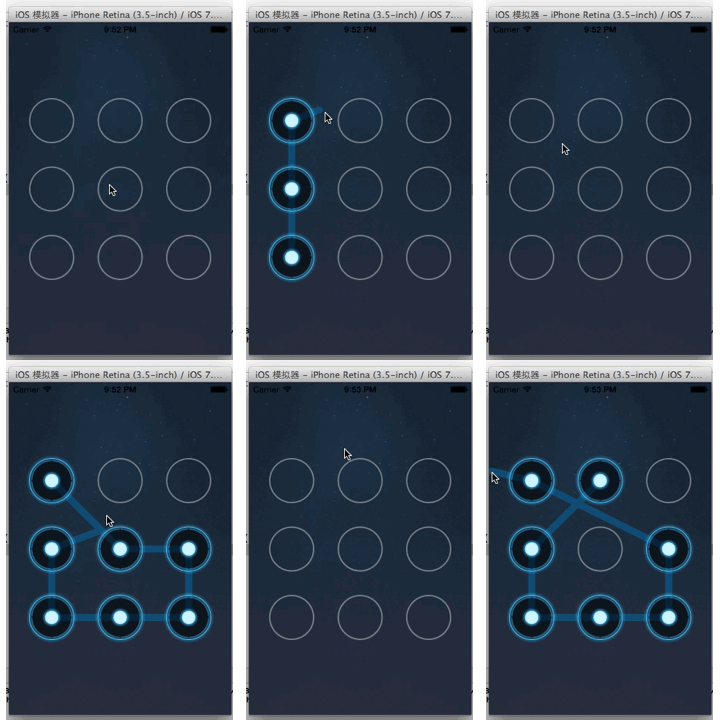
地址: 源码:效果:
代码:
NYLockView.h
//// NYLockView.h// 手势解锁//// Created by apple on 15-5-6.// Copyright (c) 2015年 znycat. All rights reserved.//#import@class NYLockView;@protocol NYLockViewDelegate - (void)lockViewDidClick:(NYLockView *)lockView andPwd:(NSString *)pwd;@end@interface NYLockView : UIView@property (nonatomic, weak)IBOutlet id delegate;@end
NYLockView.m
//// NYLockView.m// 手势解锁//// Created by apple on 15-5-6.// Copyright (c) 2015年 znycat. All rights reserved.//#import "NYLockView.h"@interface NYLockView ()@property (nonatomic, strong) NSMutableArray *buttons;/** * 定义属性,记录用户当前手指的位置(非按钮范围内) */@property (nonatomic, assign) CGPoint currentPoint;@end@implementation NYLockView- (NSMutableArray *)buttons{ if (_buttons == nil) { _buttons = [NSMutableArray array]; } return _buttons;}// 当视图是通过代码创建出来的就会调用initWithFrame- (id)initWithFrame:(CGRect)frame{ self = [super initWithFrame:frame]; if (self) { // Initialization code // NSLog(@"initWithFrame"); [self setup]; } return self;}// 当视图从xib或storyboard中创建出来就会调用- (id)initWithCoder:(NSCoder *)aDecoder{ if (self = [super initWithCoder:aDecoder]) { // 创建9个按钮 // NSLog(@"initWithCoder"); [self setup]; } return self;}/** * 创建9个按钮添加到自定view中 */- (void)setup{ for (int i = 0; i < 9; i++) { // 1.创建按钮 UIButton *btn = [UIButton buttonWithType:UIButtonTypeCustom]; // 2.设置按钮的背景图片 [btn setBackgroundImage:[UIImage imageNamed:@"gesture_node_normal"] forState:UIControlStateNormal]; [btn setBackgroundImage:[UIImage imageNamed:@"gesture_node_highlighted"] forState:UIControlStateSelected]; // 3.添加按钮到View [self addSubview:btn]; // btn.backgroundColor = [UIColor redColor]; // 4.禁止按钮的点击事件(因为我们需要监听触摸事件) btn.userInteractionEnabled = NO; // 5.设置按钮的tag作为唯一标识 btn.tag = i; }}- (void)layoutSubviews{ [super layoutSubviews]; // 设置按钮的frame for (int i = 0; i < self.subviews.count; i++) { // 1.取出对应位置的按钮 UIButton *btn = self.subviews[i]; // 2.设置frame CGFloat btnW = 74; CGFloat btnH = 74; // 2.1计算间距 CGFloat margin = (self.frame.size.width - (3 * btnW)) / 4; int col = i % 3; // 列号 int row = i / 3; // 行号 // 间距 + 列号 * (按钮宽度+ 间距) CGFloat btnX = margin + col * (btnW + margin); CGFloat btnY = margin + row * (btnW + margin); btn.frame = CGRectMake(btnX, btnY, btnW, btnH); }}- (void)touchesBegan:(NSSet *)touches withEvent:(UIEvent *)event{ // 1.获取按下的点 CGPoint startPoint = [self getCurrentTouchPoint:touches]; // 2.判断触摸的位置是否在按钮的范围内 UIButton *btn = [self getCurrentBtnWithPoint:startPoint]; // 存储按钮 if (btn) { // 设置选中状态 btn.selected = YES; // 将按钮保存到数组中 [self.buttons addObject:btn]; } btn.selected = YES; // [self setNeedsDisplay];}- (void)touchesMoved:(NSSet *)touches withEvent:(UIEvent *)event{ // 1.获取按下的点 CGPoint movePoint = [self getCurrentTouchPoint:touches]; // 2.获取触摸的按钮 UIButton *btn = [self getCurrentBtnWithPoint:movePoint]; // 存储按钮 if (btn && btn.selected != YES) { // 设置选中状态 btn.selected = YES; // 将按钮保存到数组中 [self.buttons addObject:btn]; } // 记录当前手指移动的位置 self.currentPoint = movePoint; // 通知view绘制线段 [self setNeedsDisplay];}- (void)touchesEnded:(NSSet *)touches withEvent:(UIEvent *)event{ // 取出用户输入的密码 NSMutableString *result = [NSMutableString string]; for (UIButton *btn in self.buttons) { [result appendFormat:@"%d", btn.tag ]; } // NSLog(@"result = %@", result); // 通知代理,告诉代理用户输入的密码 if ([self.delegate respondsToSelector:@selector(lockViewDidClick:andPwd:)]) { [self.delegate lockViewDidClick:self andPwd:result]; } [self.buttons makeObjectsPerformSelector:@selector(setSelected:) withObject:@(NO)]; // 清空数组 [self.buttons removeAllObjects]; [self setNeedsDisplay]; // 清空currentPoint self.currentPoint = CGPointZero;}- (void)drawRect:(CGRect)rect{ CGContextRef ctx = UIGraphicsGetCurrentContext(); // 清空上下文 CGContextClearRect(ctx, rect); // 从数组中取出所有的按钮, 连接所有按钮的中点 for (int i = 0; i < self.buttons.count; i++) { // 取出按钮 UIButton *btn = self.buttons[i]; if (0 == i) { CGContextMoveToPoint(ctx, btn.center.x, btn.center.y); }else { CGContextAddLineToPoint(ctx, btn.center.x, btn.center.y); } } // 判断如果当前点是00就不会只 // if (!CGPointEqualToPoint(self.currentPoint, CGPointZero)) { // // // 当所有的按钮的中点都连接号之后再连接手指当前的位置 // CGContextAddLineToPoint(ctx, self.currentPoint.x, self.currentPoint.y); // } // 判断数组中是否有按钮, 如果有按钮就有起点, 有起点就不会报错 if (self.buttons.count != 0) { CGContextAddLineToPoint(ctx, self.currentPoint.x, self.currentPoint.y); } // [[UIColor greenColor] set]; [[UIColor colorWithRed:1/255.0 green:102/255.0 blue:172/255.0 alpha:0.5] set]; CGContextSetLineWidth(ctx, 10); CGContextSetLineJoin(ctx, kCGLineJoinRound); CGContextSetLineCap(ctx, kCGLineCapRound); CGContextStrokePath(ctx);}/** * 根据系统传入的UITouch集合获取当前触摸的点 * @return 当初触摸的点 */- (CGPoint)getCurrentTouchPoint:(NSSet *)touches{ // 1.获取按下的点 UITouch *touch = [touches anyObject]; CGPoint point = [touch locationInView:touch.view]; return point;}/** * 根据触摸点获取触摸到的按钮 * @return 触摸的按钮 */- (UIButton *)getCurrentBtnWithPoint:(CGPoint)point{ // 2.判断触摸的位置是否在按钮的范围内 for (UIButton *btn in self.subviews) { // if (CGRectContainsPoint(btn.frame, point)) { return btn; } } return nil;}@end NYViewController.m
//// NYViewController.m// 手势解锁//// Created by apple on 15-5-6.// Copyright (c) 2015年 znycat. All rights reserved.//#import "NYViewController.h"#import "NYLockView.h"@interface NYViewController ()@end@implementation NYViewController- (void)viewDidLoad{ [super viewDidLoad];}- (void)lockViewDidClick:(NYLockView *)lockView andPwd:(NSString *)pwd{ NSLog(@"NYViewController %@", pwd);}@end
